Saturday, July 30, 2011

An introduction I've been eager to make

Apparently in my case, the last-minute nesting instinct comes in the form of sewing rather than cleaning.  Saturday night I felt like I needed to get the binding sewn to the front of my sister's quilt {I had been putting it off in case this heat ever let up, but since that wasn't going to happen, I just did it}.  Not more than an hour after putting my machine away and folding the partially-bound quilt {I did get it sewn all around on top}, the contractions started.  I told my hubby I didn't think this was "it" though.

Well, I was wrong because just a few hours later {OK more like 12}, my beautiful Chloe was born!  She was almost three weeks early but is totally healthy and was just ready to meet us!


We are all home, resting, adjusting, redefining what our normal is, and generally enjoying being a family of four {plus my most wonderful Mom who is here for two weeks helping with the whole adjustment process}!

I won't be doing my sewing, but I'm still here and still working on the painfully-slow process of finishing my quilts!

Photobucket

Wednesday, July 20, 2011

WIP Wednesday

Besides finishing the quilting on Kitchen Windows, I also managed to go from this


to this over the last week.

After sewing the last row on last night, I kindly asked my hubby to spend "no less than 30 seconds admiring my first ever self-designed quilt!" He was very kind and spent at least 31 seconds admiring it before moving back to his own work.

Here's the entire quilt top.

I still need a little help with the whole math thing; the top is bigger than I wanted it to be, so the piece of fabric I have for the back isn't going to be big enough.  I could cut off one row on the left side and one on the top and it would all fit, or I could go with Plan B and piece some extra for the back.  I'm considering both: adding a little piecing to the back but still taking off those two rows to make it closer to the crib size (it's currently 44"x48" and I wanted it to be more like 36-40" x 40-44"). 

I have some really nice variagated orange & pink DMC Perle 8 thread that I will be using to hand quilt over the coming weeks, so don't expect to see this as a real finish any time soon.

In other WIP news, I'm still waiting on my pattern to start the Colette top, but I'll probably be putting this one off for a little while either way.  I have three quilts that need to be bound, and at least two take priority over the top.

I've kept up a pretty strong pace with the sewing recently, but I'm finally stopping (the frantic part, not the sewing!).  This baby is coming soon, and my body is ready to rest and enjoy the quieter aspects of binding and hand quilting that await!

Once again, I'm linking up with Lee and the other fabulous artists showing off their goods at WIP Wednesday!

WIP Wednesday at Freshly Pieced


Photobucket

Tuesday, July 19, 2011

Long Arm Love

{I'm sparing you the two sappy paragraphs I just wrote about how much I love quilting and how my machine won't do more than the actual piecing and blah blah blah ... on to the good stuff!}

I finished the quilting on our Kitchen Windows quilt!  This was my last one in a stack of three that I wanted to finish pre-baby.  Here she is on the Long Arm!


I used a free motion stitch for all three quilts.  For me this was so much easier than trying to use a template on the machine.  Plus I really like the freedom of being able to make cute designs

like hearts

and flowers

and even my name

I know when I wash this one the designs won't look quite the same, but I'm hopeful they'll still be intelligible!

I now have a stack of three quilts waiting to be bound.  I really wanted to get to this point so I could just enjoy the restful part of hand binding the quilts.  I like the idea of trying machine binding, but given my machine's recent history, I'll pass! 

Photobucket

Wednesday, July 13, 2011

Work in Progress Wednesday

What a week! I've got several major steps finished and am looking forward to some true finishes over the next few weeks. I would really love to have all my quilts completely finished (bound) before the baby comes, but we'll see if that happens or not!

Other than using the long arm machine {read more here} for the first time this weekend, I also got going on the baby's quilt that seemed to come out of no where at 5 am Friday morning {read about that bit here!}.  When I did the design, I forgot to add the seam allowance so instead of 99 Half Square Triangles (HSTs), I actually needed 120.  Thankfully, it wasn't a big deal to cut and sew a few more squares.

It was really fun to go from large stacks of squares

 To a whole buncha Half Square Triangles

Although I've used these in a quilt block, I've never made a significant number before. I am glad this is just a baby sized quilt!

This is also my first time designing my own quilt {hence forgetting the seam allowance when determining the size of my HSTs}.  Bec over at Chasing Cottons is wrapping up a really helpful Quilting 101 on her blog {it should really be 101 + 102 + .... it's super in depth}.  One of the posts discussed designing the actual quilt, and that helped me quite a bit.  I also used Rachel's tutorial for the HSTs.

I am planning to hand quilt this one, which is something totally new to me, so if you have any suggestions on techniques, threads, thimbles, needles, or how to make a chocolate cake, I'll be happy to hear from you :)

OK, so my Works in Progress...
Bind my sister's Parisville Quilt
Bind the New Wave Quilt
Sew the Kitchen Windows quilt back
Quilt Kitchen Windows
Bind Kitchen Windows
{do you see a theme yet?}
Sew together the HSTs to make the baby quilt top
{you get the idea...}

On hold
Finishing Della's "first" quilt {My sewing budget is way over this month thanks to renting the Long Arm, so I'm going to hold off on this one!}
Violet Top {I'm waiting on the pattern plus I want to make it when my mom is here and can help me!}

WIP Wednesday at Freshly Pieced
Photobucket

Tuesday, July 12, 2011

Learning to use the Long Arm Machine

This weekend I finally got to take the long arm machine quilting class I signed up for last month!  It was a lot of information crammed into a short amount of time, but it was really fun to see how the machine works and to play around with a few of the techniques like free motion quilting and using template designs.  The best part was that taking the class made me eligible to actually use the machine on my own quilts!

My sister's Modern Sampler quilt was of course the one that got this whole thing started, so that was the first one I did.  I'm going to be a total tease today though and say, "Sorry, no pictures of that one just yet."  Since it's a gift, I want her to see it before I show it off.  It took me about three hours to load the machine and do the quilting, but part of the problem was that I picked a faulty spool of thread that kept breaking and added a good 45 minutes to my quilting time.  It was pretty frustrating, but I became really familiar with the machine thanks to that!

The second quilt I did was the New Wave Quilt.  This is a little less of a teaser, but it's also the last you'll see of the quilt until the end of the year.  It's going to be a gift too! This one was much quicker. It's about the same size but only took an hour and fifteen minutes to load and quilt.  That's partly because I knew what I was doing with the loading and partly because my thread only broke once.


{Oh and just to brag on my hubby for a minute...I told him I would only be gone three hours when I left.  I called him three hours later to say I was "nearly" finished with the first quilt and asked if he would watch Della so I could go ahead and do the second.  Of course he said Yes and ended up letting me have a whopping 6 hours of alone time...something which is nearly unheard of (not because our hubby's aren't capable or willing to watch the kids; it's just not easy to get that much time worked out at once!)  It.was.amazing.}

I went in with really specific ideas of how I wanted to quilt each of these and came out with something completely different for each one!  The machine has a way of affecting you in a mind-controlling sort of way! I think part of that is it's just so totally different than quilting on a sewing machine.  On the sewing machine you're so confined with the space that it's hard to get really fluid motions.  Straight lines, squares, grids, etc. make a lot of sense.  With the long arm you almost need to be using fluid motions so it's really ideal for free motion quilting. 

I am going back next weekend to quilt our Kitchen Windows quilt, and once I get that all finished and bound, I'll give you some full shots instead of all these teasers. 

Photobucket

Friday, July 8, 2011

When inspiration hits, you have to run with it

What started off last night as a pile of fabrics to "eventually" or "possibly" use in the new baby's quilt

Had me lying awake at five this morning begging to be brought out into something like this

Then a sale at the local quilt shop added these beauties

And now tonight I will be busy cutting lots of squares to make 99 Half Square Triangles.
I will let you know how it all goes.

Oh and tomorrow is the big day when I get to learn how to use a long arm quilting machine!  Happy Weekend, friends!

Photobucket


Thursday, July 7, 2011

I'm on Craft Gossip!

As seen on CraftGossip.com


I cannot tell you how many times I have been to Craft Gossip over the last few years of sewing to try to figure out how to sew a zipper pouch, or make a stuffed panda bear {ok, not really}, but that website is full of links to tutorials on how to make just about everything.  When I posted my Make-up Brush Roll Tutorial, Sara suggested I submit it to Craft Gossip, and I'll admit the thought had not even crossed my mind.  But I did, and I got a super fast reply that my tutorial was officially on their site!  {cue the confetti!}  So, thanks Sara for the suggestion!

If you missed the tutorial, you can find it here:


Photobucket

Wednesday, July 6, 2011

Work in Progress Wednesday: Baby Snuggler and Potholders

I have officially made something for the baby! I wouldn't say I was feeling guilty about this, but I definitely wanted her to have something specifically for her from me when she is born.  I made quite a few burp cloths and a diaper bag for Della when she was born, and I didn't want this baby to have nothing of "her own" {as if she would really care!}  I made a Snuggler from Lotta Jansdotter's book, Simple Sewing for Baby.


This really was a simple project in most ways, and I made very few changes to it.  I used a lightweight quilting cotton and flannel from Joann's fabric for this project.  I didn't want it to scream "nursery decor", and I'm pretty happy with the light lavender palette of this cozy blanket.  Now I just need to wait {approximately} five more weeks to have a sweet baby to wrap up inside!

I actually had quite a bit of sewing time this weekend, so here goes:
Finishes
New Wave Quilt Top You can't see this one yet, but let me just say, it.is.gorgeous. 
Make-up Brush Roll I actually made two because the first wasn't really good enough to give as a gift to my friend.  The best part was making a tutorial the second time around so that others can make one!  I think this is my first tutorial, and I do not think it will be my last ;)


Project for the Baby I already told you about the snuggle blanket.
Modern Stash Quilting Bee Block I fiinished my last block and wrote about the overall experience of being in a bee with a look back at all the blocks I made over the 6 months.  


Next Up
Learning to Use a Long Arm Machine!  I am counting down the days to Saturday when I take a class to learn how to use a long arm for finishing my quilts!  A year ago I never thought I would be so fanatic about quilting, let alone learning to use a long arm.  So.Excited.
Quilt Backs I need to make the backs for my Kitchen Windows and New Wave Quilts so that when I go in the weekend after this to use the long arm I have something to quilt!
Colette Sewing: Violet Top  It is going to be nice to re-expand my wardrobe after the baby comes, and my first piece will be the Violet Top from Colette Patterns.  I'm joining Sara in her sewing endeavors {though I'm not quite as ambitious}!
Kitchen Accessories I made one more potholder in this really long-and-drawn-out process of spicing up my own kitchen.  It's good to have little projects like this on the days I need a break from some of the bigger ones.  Next up I will be covering some canvases in fabric to adorn the walls and maybe a new hand towel or two.


As usual, I'm linking up with Lee...

WIP Wednesday at Freshly Pieced


Photobucket

Tuesday, July 5, 2011

Modern Stash Quilting Bee: A Wrap Up

When I started the Modern Stash Quilting Bee, I had several personal objectives in mind: learn new quilting techniques, make several quilt blocks without having to repeat the same block over and over again, use up the fabrics I had on hand, and of course be a part of a small "community" of sorts of other quilters.  I can say I was not disappointed in the objectives and outcomes.  I feel like the common words "fun" and "challenging" really are great ways to describe this experience although it was far from common.

One thing I loved is that each person picked something totally unique to them.  Whether it was the color combination, block design, or general desire to have bee members interpret a theme, each block was in its own way a small project that required a good amount of attention and forethought.

Now that the bee is over, it's fun to look back at the blocks I made and re-read my experiences making them.


1. Bento Box Block for me
2. Window Frame Block for Mer
3. Pinwheel Sampler for Theresa
4. Liberated Church Dash Block for Toni
5. Patchwork Square in Square for Casey
6. Mod Mosaic Block for Pam
7. Wonky Star Block for Lindsey
8. Improv Flowers Block for Hil
9. Improv Pink and Orange Block for Johanna
10. Cathedral Windows Block for Sara
11. Hexagon Block for Sandi
12. Prairie Inspired Block for Sharon 

Do you see now why I loved this bee so much?  I wish I could sign on for Round Two this month, but that is going to have to wait until things calm down--who knows when that will be considering it isn't even "crazy" yet! 

Several members have posted pictures of all of their blocks together.  I love this part when you get to see your little project as part of something much bigger than just you.  You can see some of these photos as well as the blocks other members have made on the group's Flickr page.


Photobucket

Sunday, July 3, 2011

Make-up Brush Roll Sewing Tutorial

This simple sewing tutorial is a great way to use up some of your bigger fabric scraps and have a place to house your fancy make-up brushes when you are traveling.  I tried to be pretty detailed so that a beginner can use this tutorial without too much guesswork!


All seams are 1/2" unless otherwise noted
Measurements are given as height x width

Start by gathering your materials. You will need:

Outer Pannel 8.5" x 13"
Inside lining 11" x 13"
Upper Flap 3.5" x 13"
Pocket Piece 10" x 13"
2 pieces of ribbon, 12" long
1 lightweight iron-on interfacing 7.5" x 12" {for outer pannel}
1 lightweight iron-on interfacing 10" x 12" {for inside lining}
Ruler
Scissors/Rotary Cutter
Turning tool (chopstick)
Pencil


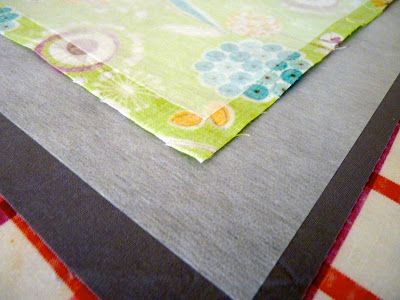
After you have cut your fabrics to size, adhere the interfacing to the back sides of your outer panel and inside lining pieces according the the manufacturer's directions.  The interfacing should be centered so that it doesn't go to any of the edges of your fabric.  This will help keep some of the bulk out of the seams.


While your iron is still hot, fold the pocket piece in half, with the wrong sides together, so that it measures 5" x 13".  Iron to set the crease.  Set the pocket and inner lining pieces aside for now.


Place your outer panel piece right side up, and lay the upper flap piece on top of it so the right sides are together.  The pieces should line up across the top.  Pin in place and sew along the top (the 13" side), backstitching at the beginning and end.


Press this seam open and iron the right side as well just to get out any wrinkles.


Now you are going to stitch a line along the very top of the flap as close to the seam as you can get without actually being in the seam.  This will help create a clean crease when we finish the flap at the very end.


Take your two pieces of ribbon and stitch them onto the printed side of your outer panel about 3" down from the seam between the panel and the flap.  The ribbons should be on your right side as shown in the picture.  Do not backstitch; this is basically just basting them in place.  The seam allowance here is less than 1/4".


Now lay your inside lining piece flat and lay the pocket piece over it.  The bottom raw edge of the pocket should line up with the bottom of the inside lining so the fold of the pocket is on top.  Get your ruler and mark a line that is 3" from the left side of the pocket.  Each of the following measurements work from the last line your drew: 2" (so now 5" from the left side...), 1.5", 1.5", 1", 1".  You can customize this however you want, but I found this gives enough variety to fit several different sized brushes.  At this point I place several pins around the edges just to be sure everything stays in place while I'm sewing the pocket lines.


Sew along each of your pocket lines, being sure to backstitch at the beginning and end of each. At the top of the pocket, I backstitch 5-6 stitches just to be sure the brushes don't wind up pulling out my stitching.


I also stitch about a 1/4" seam along the two raw sides of the pocket piece so I know it won't move while I'm sewing everything together.


Now lay out your outer panel piece with the right side up and arrange the ribbon so it won't get in the way while you sew it all together {The flap should lay flat at the top at this point}.


Lay the inner lining/pocket piece right side down on top of the outer pannel.  The pocket should be on the bottom so things aren't upside-down when you're all done!  Pin around the edges to keep everything in place as you sew.


I use special pins to mark where I am going to start and stop sewing.  You'll need to leave a 3" opening when you sew so that you can turn the whole thing right side out.  Just be sure the opening is not where the pocket is; that will make closing it a bit more difficult.  The top would also be a suitable place for this opening.  Sew all the way around the edges of your roll, with the exception of your 3" opening.  Be sure to backstitch at the beginning and end.


Clip your corners to take off some excess fabric but be sure you don't clip your stitches!  {I've made that mistake several times.}


Now start to gently pull the roll out through the opening so that it is right side out.  It will get wrinkled during this process, but that's OK!  Use your chopstick or other turning tool to push out the corners and seams all the way around the roll.


At this point, I make sure my steam is turned about high on my iron, and I iron the entire roll flat.  I set my seams so that everything will line up the way I want it to when I topstitch all of it.  Double check that you didn't bunch up your fabric in the opening so when you sew it closed, you won't have any weird gaps.


Beginning at the opening you used for turning the roll, topstitch all the way around the roll with a 1/8" seam.  You're almost finished!


With the steam still set on the iron, iron your flap piece towards the inside of the roll.  The line you stitched on it at the beginning should help it roll over evenly so that your seam between the flap and outer panel lays centered at the top.


Now fill your roll with your make-up brushes and enjoy!!


If you make one of these, I would love to see it.  Feel free to post a link to your picture or blog post in the comments.  Also if you have any questions, you can leave them in the comments and I'll answer there as well as via email.

Happy Sewing!


As seen on CraftGossip.com

Photobucket