{This post could also be titled: How to Fry Your Brain}
It's official now: March is over. I mailed my last March MSQB block Friday morning after a grueling Thursday evening making it. We followed the instructions from Elizabeth Hartman's Mod Mosaic Floor Pillow and made it 12.5" square.
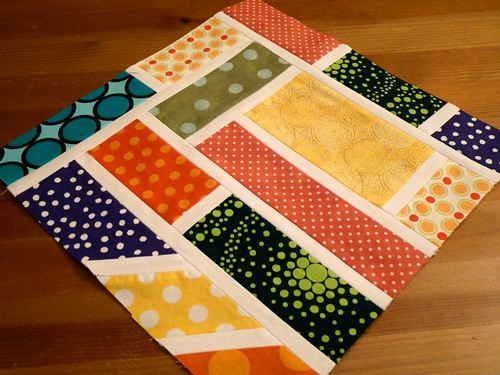
Remember Take One of this block? Take Two is so. much. better. The seams don't look wonky thanks to my handy new 1/4" presser foot!, and it really is a square, not an odd-sized rectangle. Also I feel like the fabrics go together a bit better. I stuck with polka dots rather than a bunch of different prints. This is such a busy block and I feel like that helps bring some balance.
Another fun theme here you wouldn't otherwise know is that all of these fabrics are from a little scrap swap I did with Sara a few weeks back. So these all came from her stash! she felt bad for me after I ranted about not knowing of these sorts of things and swapped with me even though her swap had already closed...thanks again, Sara!
For those wondering about making this block...it is difficult. I'm not gonna lie. My head still hurts from thinking this one through. The only measurements you are given to go by are the 1" sashing pieces you cut and then whatever your end goal is for a final size. From there you have to decide how you are going to meet that goal.
The very first thing I did was make the section with the diagonal lines. I knew that if I were going to attempt that I had to get it right before going any further. Once I had those pieces sewn together and ironed, I trimmed them so the edges were all even and basically counted it as one piece of the puzzle. Then I began to lay out the rest of my fabric to fill a 13" square. From there I just started pairing smaller pieces together in the middle and eventually got all the pieces sewn together. If I hadn't used every ounce of mental energy I have on this, I would have thought to take pictures for you to see what the heck I mean.
I trimmed as I sewed, so sometimes I would have unsewn pieces overlapping on the 13" template, but once they were sewn and trimmed, they fit right. Also, because of the way the sashing is added, when you lose a 1/4" side of the fabric to sewing it together, you gain it back from the sashing so don't lay out the sashing in the 13" square with the rest of the fabrics.
If that all reads like jibberish, I'm sorry. It still feels like jibberish to me. All I know is that I somehow managed to get this to look good; that's my story and I'm sticking to it. I should also say that although this was the most difficult block I have sewn, it was also the most rewarding. I most certainly did do several fist pumps and a small booty shake upon completion of the block.
And for those of you still with me after the fist pumps and booty shake, here's your quilty tip: Check your needle placement before pressing GO! Oops! I forgot to set my needle to the center, so it missed the little hole in my presser foot and broke & bent instead. My bad. Sorry needle. You needed to be replaced anyways. I always keep plenty of extras in my sewing basket for moments like this that's the other half of your tip in case you missed it.

Have you made this block? Did you find it to be difficult or not so much? I imagine that there are people our there who didn't have such a challenge with this, but I am not one of them!

It looks wonderful! I think you did a great job!!!
ReplyDeleteKelly, I feel awful now, giving you such a headache! Well done though on getting it done, you have done a magnificent job with it. Any wonder you are pleased March is over!! Thanks for your perseverance.... Hugs from Australia
ReplyDelete