Friday, April 30, 2010
Did you notice the blog mini-update?
If you want to add one of these to your blog, Facebook, or Twitter page, just go to your Etsy favorites, and look for the little "Share" link on the right side at the top of your gallery. Click on that and you'll find out how to add it to your page.
What is in your Etsy Favorites? Feel free to leave a link to your favorites in the comments; I would love to see what you are "heart-ing" these days!
Thursday, April 29, 2010
Lookie what I won!
So last night when I got home from work there was a large, unopened, yellow envelope sitting on the table. That could only mean one thing: I got a present! I checked the return address, and it said Robert Kaufman. Wait! I didn't order anything. Oh man, I am going to be in big trouble if I bought something and already forgot what it was. Then I remembered, I won a giveaway last month on the Purl Bee! Yipee!
I won the newest edition of Kona's Cotton Solids Color Card! I will admit that this is something I would not have bought on my own (I'm not a quilter, and sewing is not my full time job, so I don't think I could have justified it). However, now that I have it, I am thrilled! Adeline was sitting on my lap when I opened it, and she loved all of the colors too. She squealed for a few minutes with the joy of just looking at it!
I have several projects lined up already, including Adeline's birthday quilt, that this will be really handy for. I am sure I will find plenty of other excuses to use it as well! And, maybe this is a sign that I should buckle down and do a little more quilting. or not. Regardless of my quilting tendencies, I want to say Thank You to the Purl Bee and Robert Kaufman/Kona for sponsoring this giveaway!
Tuesday, April 27, 2010
Inspiration: Spring Top Week
For now, I am thoroughly enjoying perusing the many beautiful tops entered into the Spring Top Challenge over at Made by Rae.
Blogger and designer Rae has challenged ladies and gentlemen to do a little sewing for themselves and is running a very competitive and top-quality pun intended race for sewing spring tops. (there are some fabulous prizes to boot!)
I have been looking through the flickr pool of entries and here are some of my favorites
Saturday, April 24, 2010
I'm feeling a little biased.
In all seriousness though, why didn't I think of this?! I rarely use bias tape because (1) I don't really know what I'm doing and (2) I think the solid colors can be pretty boring. Claire from Heart Handmade posted a link to a UK shop that had gorgeous rolls of bias tape. I started looking to see if they were sold stateside but I did not get deep into looking because I got distracted by this:
You can find these sets here:
1. Shasta Creations
2. Color Funky
3. 32 Degrees North Supplies
4. Polly Danger Notions
Brilliant! I have made bias binding for various projects with printed fabric but never thought about making it for others! I am not ready to start rolling out a bunch of new binding, but I am now inspired to bust out my fabric stash and make some for myself!
I will be working on a sun hat for Adeline this weekend and think I will include a little bias tape of my own.
Friday, April 23, 2010
Giveaway Winner!
Thank you to all of you who entered and who read my blog(s)! I hope we get to do this again soon, hard part and all!
And now the part you have been waiting for! (I am sure you really read all of this first!)
The winner of the cloth napkins is Claire from heart handmade!
And the winner of a little surprise is Dawn of hello dearie!
sorry for the blurry pictures...I was using my iPhone to save time...
Thursday, April 22, 2010
giveaway reminder
Wednesday, April 21, 2010
Pattern Review: Madeline Knot Dress Pattern
Six months later I was at the fabric store and came across some beautiful voile. Mind you, I was there to pick up interfacing for another project, not fabric. The voile was on sale, and I knew as soon as I saw that it would be perfect for the Knot Dress. (The pattern suggests using three different fabrics, but I just stuck with two.
Side note: if you want tips for sewing voile see the Above All Fabric blog post and Anna Maria Horner’s blog post about their experiences with voile. This post is not meant to be about voile though (although I think it is a really great fabric for clothing, especially for babies. My daughter loves feeling the texture! Ahem, back on track…)
When I cut out the pattern, I decided to make two dresses. I figured I could use the first for Adeline and put the second one in the shop. That way I could work out the kinks in her dress! There is quite a bit of measuring involved, and since I did the job downstairs talking with my husband, it took at least an hour to cut out all of the pieces. I didn’t mind that though.
Most of the steps are fairly straight-forward. Sew one side to the other and make a few hems. Not bad. However toward the end of the instructions, there were a few places that were slightly confusing. I think I figured them out fairly quickly, but at one point I had to spend 15 minutes ripping a seam—something I loathe doing with great intensity. Please note: this was probably an equal part of me not paying close enough attention and the pattern being partially difficult to understand. My mom probably would have had no problems with it.
There are two “tips” I wish had been included in the pattern and the lack of these notes has kept me from considering this even an “advanced beginner” level tutorial. The first is that when you baste your fabric with the idea of pulling threads to gather it, simply setting the top stitch on the longest setting is not enough. You really need to loosen your tension as well. If you are using voile (again off topic slightly), be sure you sew between those little bumps or your thread will get caught as you gather the fabric!
The other place I had a problem was sewing the gathered skirt to the top portion of the dress. If you are making this pattern, be sure to use extra pins where the side seams match up or one of the seams will inevitably be off kilter on one side or the other.
I noticed this after the first dress (Adeline’s version!) and tried to use an extra pin or two, but I still have about a ½-inch difference in the seams on one side of the second dress. It is so frustrating to have such a beautiful dress with one little (albeit significant if you’re selling something!) mistake. Use lots of pins!!
Sewing both dresses took me about 4.5 hours total (remember one hour was spent cutting pieces; it shouldn't take that long if you're able to focus!) I would guess that to make this dress one time through could easily take 3 hours the first time and then 2.5 or just under once you really know what you are doing. Even with the mis-matched side seams, I really like this and am looking forward to my daughter being able to wear it (I made a size 12 months). The sizing is pretty accurate with this pattern.
I will probably not be making many of these for the shop any time soon due to the amount of time they take to sew. I really like this dress though so I could see myself making one again in the near future with another fabric.
To purchase this pattern, go to Romeo and Mae's shop
To purchase a complete dress, email irene design
Monday, April 19, 2010
Earth Day Giveaway

This one of the favorite sets I have made and are perfect for Summer. (If you live south of the equator and happen to win, you can use them in a few more months ;) I am giving away one set of four napkins that measure [approximately] 15x15 inches. {A $16 value} Also, I am offering free shipping on the cloth napkins that are in my shop.
Here are the rules
1. The giveaway is running April 19-Midnight (EST) April 22, 2010.
2. The giveaway is open to those who live inside and outside the United States.
3. However, since this is meant to say THANK YOU to my blog readers, you do have to subscribe* to one of my blogs to be eligible.
4. I will use a random number generator to determine who the winner is. I will post the winner here Friday and you will have until Midnight Sunday to get back to me with your mailing address. got that, Cinderella? If I don't hear from the first winner by then, I will select another winner.
5. Finally, here is how YOU can enter. (ONE COMMENT ONLY PER PERSON)
Leave a comment letting me know (a) that you subscribe* to Irene Design or Quest for Real Food and (b) if you are planning anything special for Earth Day, let me know what that is.
*If you do not already subscribe to Irene Design with you RSS reader (such as Google Reader or via email), or through Google Friend Connect, go ahead and do so now! If this blog isn't of particular interest to you, check out my other blog about my quest eating sustainable, healthy foods without going broke!
Again, thanks to all of you who read both Irene Design and Quest for Real Food.
Sunday, April 18, 2010
Officially moved and other announcements
Remember when I told you about the Indie Business class I was taking? Well the six weeks have now passed, and the class is officially over. I am still somewhere back on week three though! I got a bit off track with the new food blog and trying to get out and enjoy the spring weather a bit more. This has all offered some new perspective.
One thing I have decided is that selling what I make is not something I want to focus on with what little free time I do have. I really enjoy sewing for others, but I most enjoy it when I know who I am sewing for. So with the exception of some items I have already made but have not listed, and whatever projects may randomly pop up, I will not be putting much effort into selling on the great unknown internet. Perhaps I will come back to it next month (sort of kidding!)
I will still be sewing (I have stacks of projects just waiting for me to pick them up!) and I will still be sharing what I am doing here. And of course if you ever see something I make and want one for yourself, please don't hesitate to contact me and let me know (like I said, I really enjoy sewing when I know who it is for!)
Finally, to say THANK YOU to all those who read my blog(s), and to celebrate Earth Day, I am going to be hosting a little giveaway starting at 8:00 a.m. tomorrow morning! That's right. Come back tomorrow for more.
Monday, April 12, 2010
"Monday" or "how I avoided my chores"
Thursday, April 8, 2010
The Irene Design Blog Move
I just announced on my wordpress blog that I will be moving HERE!
In an effort to streamline everything I am doing, I am moving my blog to a blogspot address. Between now and April 15, I will double post on both blogs (so they will be the same). However after April 15, I will only add new posts to the blogspot domain.
I thought long and hard about this because I do not want to add to anyone’s confusion, and I do not want to loose any readers. If you currently have my blog bookmarked in your internet browser, or if you subscribe to my blog with a feed reader (RSS, Google Reader, etc.) please replace my wordpress address with this one:
http://irenedesign.blogspot.com
Wednesday, April 7, 2010
Almost-Wordless Wednesday
Easter Weekend wrap up
Taking lots of pictures (I love family photos!) The band. Seriously, this bluegrass band did a great job entertaining all of us. They led the party all night at the reception (we square danced!) then back at the Inn (yes, I laid in bed listening to them play until 2am), and then on Easter morning the cellist played right outside of our window to welcome the morning.
(that is a cello, right?!)
Sunrise on Easter Morning
Hiking at the Natural Bridge State Park in Eastern Kentucky
We really had a great weekend full of friends (we did go up for a wedding!), great food (our friends are farmers!), laughing, fresh mountain air, and enough dancing and hiking to make my calves ache well into the week.
Descending Theology: The Resurrection
by Mary Karrit’s your limbs he comes to fill, as warm water
Descending Theology: The Resurrection
by Mary Karr
From the far star points of his pinned extremities,
cold inched in—black ice and squid ink—
till the hung flesh was empty.
Lonely in that void even for pain,
he missed his splintered feet,
the human stare buried in his face.
He ached for two hands made of meat
he could reach to the end of.
In the corpse’s core, the stone fist
of his heart began to bang
on the stiff chest’s door, and breath spilled
back into that battered shape. Now
it’s your limbs he comes to fill, as warm water
shatters at birth, rivering every way.
New Photo Preview, plus some photo tips
 Whether reading through the Etsy Shop Makeover Series, or a list of tips on the Indie Biz 2.0 course, one of the most common pieces of advice given to sellers is
TAKE GOOD PHOTOS.
I will admit to using less than worthy pictures in my listings, but from here out, I am focusing on photos that would make me want to buy the product.
Remember when selling something online, the customer cannot actually pick up the item and see that "it is so much better than the pictures lets on."
For me, this means photographing in the afternoon in my kitchen, backyard, or dining room. These are all places I get plenty of indirect natural light. It also means taking 20+ pictures of one item, using different backgrounds and various angles, to find a few that really work. I have some great pictures with horrible hues because I photographed at night in my sewing room rather than during the day when the sunlight is pouring in.
I then spend some time editing. I enhance the exposure, crop around the image, add backgrounds and even text, all to make sure that my photo shows how great the product is. I am not a professional photographer, but thanks to programs like iPhoto and Picnik, I can make some minor adjustments that can really show off the images. When I do not take the time to do this, it really shows via poor photo quality and no sales!
Once that is all said and done I'm ready to add the photos to a listing. That's another story, or another post. For now I have lots of editing to do so I can get these items listed!
One of my goals for April is to photograph all of my unlisted and listed items to make sure they are really spectacular. By the end of April I hope to have no more "so-so" photos in my shop.
{Shameless} Plug: Today on Quest for Real Food: Tips for Buying Local Foods
Pattern Review: Reversible Mary Jane Baby Shoes
Original Post Dated March 15, 2009

Designer: SweetPeaPattern
Pattern Type: Electronic, Adobe PDF
Sewing Level: Intermediate (just over Beginner)
Can you sell items made from the pattern? YES.
A few weeks ago I was browsing baby dresses and patterns on Etsy and came across this pattern for reversible Mary Janes with three strap options from SweetPeaPattern. I will admit that this was a bit of an impulse buy, but from the listing I thought these little shoes would be a great little project to use up some of the many fat quarters and other fabric scraps I have overflowing my boxes in the sewing room.
The pattern came to me via email within several hours. I have come to appreciate pdf patterns on several levels. I like that there is no middle-man; I receive the pattern directly from the person who made it. That usually translates into a decent priced pattern for me, and more profit made for the designer. I have also found that pdf patterns are usually a labor of love: the photos are in color, the details are clearly laid out, and if something is not easily understood, the designer is usually readily available to answer questions.

After receiving the pattern, I printed it out and cut the pieces for a 6-9 month shoe with ribbon ties. The pattern comes with lots of pictures and does not assume that the sewist knows more than s/he actually does. Given the method of sewing the pieces together, it would have been very easy to make the directions more difficult than needed, but instead there were very clearly written directions and pictures to answer questions left by the instructions. There are even little side notes and tips to make sure your shoes don't pucker or cave.
All in all it took me about 70 minutes to make one pair of shoes. I am so pleased with the outcome, even on the first try. My daughter is nearly 7 months old, and I would have been fine using the 3-6 month pattern for her. I think these will not actually fit well for another month. She does love the shoes though and enjoys playing with the ribbons!
Did I mention yet that these are reversible? I love that these can be made with complimenting fabrics, and both fabrics can be used as the liner or the actual shoes!! The other good thing with this is that all of the seams are encased so there are no unsightly raw edges.
I have not made the other two versions of this shoe yet, but I plan to do so soon. Once you make one pair, I think it will be easy to make the others without a great deal of additional effort.
One more note to make, SweetPeaPatterns not only offers these sweet little Mary Janes but also has some loafers for little boys, kimono style shoes, seamless slippers, ballet style shoes and a pattern for car seat strap covers.
Want to buy the pattern? Visit SweetPeaPattern shop
Want to buy some already made shoes? Contact irenedesign@ymail[dot]com
Irene Design was not paid to conduct this review and is not supported by SweetPeaPattern. Sewing Pattern Photos come from and belong to SweetPeaPattern.
Pattern Review: Craft Apple Diaper Bag
Format: Paper Pattern
Skill level: Intermediate
Designer: Linda from Craft Apple
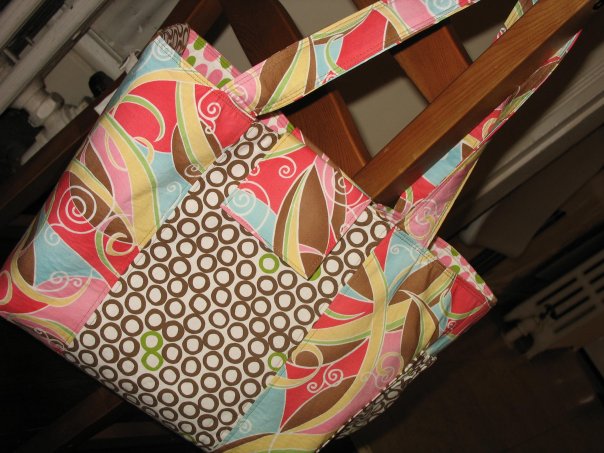
When Brandon left for work yesterday, I told him that my goal was to have the bag finished by 7pm. Sure enough, by 7pm I had washed and dried my hair, carried various dishes to the sink, and oh yes, finished my diaper bag! I gave myself a few pats on the back, took some photos of the bag, and added them to my facebook page for the world to see (of course).
Now, to give credit where it is due, I used this pattern from Craft Apple, who has one other bag pattern I may like to try at some point. (Remember, I am by no means good at following directions, so for me to have finished a project like this based on someone else's directions is quite a feat not only for me but for the pattern writer!) About mid-way through this project, I told Brandon that I would not be making this bag again. It was taking way too long, and I just couldn't figure out how to box the corners at the bottom of the bag. However, I feel differently now. I can now box the bottom corners with ease and I think that making the bag a second time would take me about half as long as it did this time--in other words, I would not need a three day weekend to complete the project!
If you're thinking of making this bag, here are a few notes from my experience:
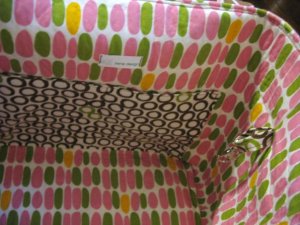
I pretty much stuck to the rules, with the exception of adding a key hook at the opposite end of the cell phone pocket. To do this I cut a piece of fabric 2"widex5"long. I folded in a 1/2" crease on each long side then folded it in half lengthwise to enclose the long raw edges (using an iron to keep folds in place). At this point, it measured 1/2"widex5"long. I sewed a 1/8" top seam on both long sides. I put a lobster hook on the piece of fabric and just sewed the raw edges into the middle seam when it was time. (Does all of that make sense??)
I used regular quilting-weight cotton fabrics rather than the heavier weight fabrics suggested on the pattern. The bag does not stand perfectly upright on its own, but that is not a big deal to me.
Rather than placing the interfacing on the fabric prior to cutting, I chose to cut the pieces and interface them separately because I knew I would have left-over fabric (I bought 1 yard of each of the three I used). I didn't want to have interfacing on my left-overs. The problem is that is it took me at least twice as long to do the initial preparation phase as it would have if I had just interfaced the whole fabric piece...I would not recommend doing what I did.
Also, I found that I needed 3 1/2 yards of interfacing and 1/2 yard of the Peltex 70.
Definitely take the extra 30 seconds to mark each piece with masking tape so you know which is which...there are a lot of pieces to this pattern, and it's much simpler to be able to pick up a piece and see the corresponding letter on it rather than guessing if you have the right one or not.
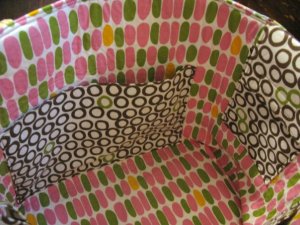
I really like that this bag has several varieties of pocket sizes for keeping all those weird things babies and mommies (or daddies!) need like pacifiers, bottles, diapers, and cell phones! My iPhone fits perfectly into the enclosed pocket on the side of the bag. The pockets are very sturdy because the fabric pieces get folded in half and are interfaced, so they don't seem flimsy even with using a lighter-weight cotton than called for in the pattern.
Finally, if you're wondering about the great fabrics I used, I got those from Above All Fabrics. The exterior side fabric is Sorbet Twist Watermelon from Moda Fabrics. The middle exterior fabric and pocket fabric is Cocoa Rings Circle Dot from Robert Kaufman fabrics, and the interior fabric is Spring Stones, also a Robert Kaufman fabric.
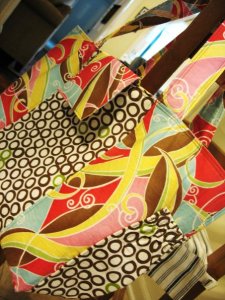
I'm really happy with how this bag turned out and can't wait to be able to use it (I have just about 7 weeks left!!) This is a pattern I will definitely be saving in hopes of making again.
(If you are interested in having a similar bag made for you or as a gift, feel free to contact me via email at irenedesign[at]ymail[dot]com).
Edited to add: I have since used this bag for nearly 8 months now. I still find that this is my go-to bag because it is just so functional. I have plans to make at least one more with more neutral colors so it coordinates with my outfits a bit more!
Pattern Review: Milla Modern Pinafore Pattern
Skill Level: Advanced Beginner, Intermediate
Designer: Romeo and Mae
I could (and sometimes do) spend hours browsing through patterns and fabrics online. I would do it in person if I had the time. I recently found some patterns by Romeo and Mae that I fell head over heels for. What's a girl to do when she falls head over heels for a pattern but buy it? (How materialistic does that sound? yikes!)
I purchased the Milla Modern Pinafor pattern and haven't looked back. I made three dresses in one weekend and another dress this past weekend but couldn't get the pictures because I had this huge ordeal with trying to get the snaps on. The short version of the story is that I finally had a coupon for Joann's so I bit the bullet and bought a real pair of snap pliers. It was the best decision I made since buying this pattern.
The pattern comes as a .pdf straight to your inbox so you don't have to wait a week for the mailman to show up. You can also print it out in every size rather than messing around with folding the right size from your pattern.
The pattern and directions are very straightforward; there were no points of confusion for me, and that is saying a lot. I really do not do well with directions, but this pattern may be the first exception.
My one complaint--and this is a small one--is that the sizing seems a bit off. I have an average sized two month old, and when I made the first dress using the 0-3 month size, it was too small for her. So I have been making one size up for her. I still need to make a few adjustments to the sizing because even the 3-6 month size is border line too tight around the chest. If Iwant her to be able to wear the dress for more than one month, I will need to widen the chest area a bit and lengthen the straps. I would say that a 1/2" addition to all seems would do the trick.
It takes me about 1.5 hours to make one dress from start to finish. I think I am getting it down to closer to an hour though.
One thing I love about this pattern is how versatile it is. The dress would be really cute in the summer as a stand alone outfit, but it can also be paired with long sleeves and tights or baby legs for the fall and winter months.
I also love that I can mix and match my fabrics.
This pattern is a great pattern for anyone who can sew at an intermediate level or above. It does take a little know-how with maneuvering the neckline through your machine, but other than that, it is very simple.
Adeline wore the pink one to church last weekend.
This one is probably going to be one of Adeline's Christmas party dresses. She is a popular baby, so she will need more than one Christmas party dress.
This is the first one I made. It would be perfect for a newborn or very petite 0-3 month old. It is currently in my shop.
Want to make a Modern Pinafore? Check out Romeo and Mae's SHOP.
Want to buy a Modern Pinafore? Check out my SHOP.


